


Views: 0 Author: Site Editor Publish Time: 2026-10-01 Origin: Site


Cutting a stone countertop incorrectly for a new kitchen appliance is an expensive nightmare. Ordering a unit hoping it magically drops into your existing space carries immense risk. You face non-refundable restocking fees or thousands in stonework repairs if things go wrong. Homeowners often confuse a cooktop's nominal size—like 30 inches—with its actual required cutout dimensions. They are rarely the same. Precision matters immensely before you make the first cut or swipe your credit card.
Our definitive guide helps you verify every critical detail. We cover essential cutout dimensions, mandatory vertical clearances, and practical retrofit solutions. You will learn how to measure accurately and avoid catastrophic installation failures. Many people overlook ventilation limits, which ruins expensive electronics prematurely. Let us explore exactly what your next induction upgrade demands to guarantee a flawless, stress-free fit.
You cannot judge an appliance by its retail category. A 30-inch designation serves as a marketing term, not an engineering specification. You must understand how glass-top appliances sit on kitchen counters to avoid major installation mistakes.
The hole in your countertop is always smaller than the appliance itself. The delicate glass top must rest securely on the surrounding counter material. This overlap bears the combined weight of the heavy appliance, large pots, and boiling liquids. If fabricators cut the hole to match the exact 30-inch dimension, the entire unit would simply fall through the cabinet.
Typical cutout variances surprise many homeowners. Standard 30-inch units usually require cutouts measuring approximately 28.5 inches wide by 19.5 inches deep. Similarly, standard 36-inch units generally demand a 34.5-inch by 19.5-inch void. The remaining glass acts as a structural flange. It distributes downward pressure evenly across the stone beneath it.
Sometimes standard sizes do not fit your specific design constraints. Shallow counter spaces require specialized solutions. A built-in tabletop cooker often requires minimal depth. You can seamlessly integrate these modular units into narrow islands or secondary prep stations. They provide powerful cooking capabilities without demanding a massive footprint.
Tiny house remodels and luxury bar setups frequently use single-burner options. A single-hob induction cooker typically requires a cutout spanning just 11 to 15 inches wide. They serve as excellent secondary prep zones. You can install them alongside gas ranges to enjoy the best of both worlds. Their compact cutouts make them incredibly versatile for custom cabinetry designs.
Countertop cutouts rarely feature perfect 90-degree angles. Sharp internal corners create severe stress points in natural stone and engineered quartz. A heavy cast-iron pot dropped nearby can send a crack radiating outward from a sharp corner. Manufacturers specify exact corner radius measurements for their products.
Strict adherence to these radius specifications prevents catastrophic stress fractures. Fabricators typically use a core drill bit to round the corners before plunge-cutting the straight lines. If you plan to replace an existing appliance, verify the existing corner radius. Some older models required square corners, which may pose challenges for newer appliance chassis designs.
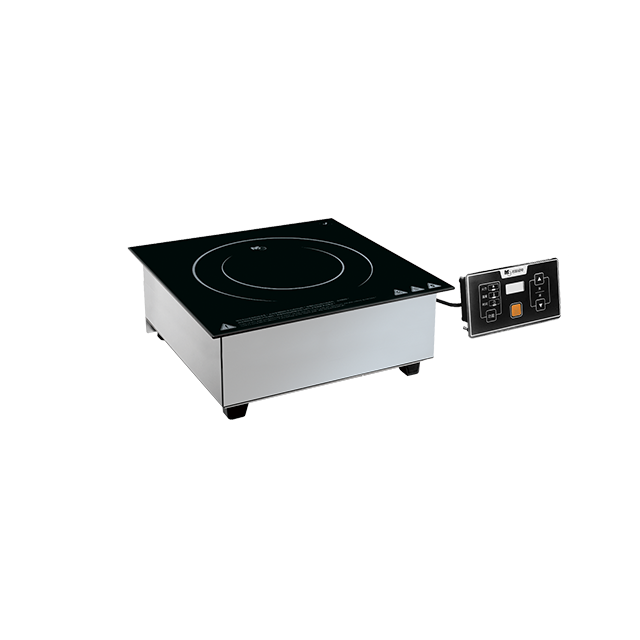
Most consumers focus entirely on surface dimensions. They ignore what happens beneath the counter. This mistake often leads to premature appliance failure. Electromagnetic cooking demands specific environmental conditions inside your cabinetry.
The cooking surface itself stays relatively cool during operation. However, the internal magnetic coils and power inverters generate significant heat. The chassis houses complex electronics similar to a high-end computer. These components require constant active cooling from built-in fans.
Inadequate ventilation creates an invisible hazard. Trapped heat causes the appliance to throttle power automatically. You might notice the water stops boiling mid-cooking. Continual overheating triggers complete thermal shutdowns. Eventually, the trapped heat cooks the internal motherboards. Manufacturers frequently void warranties if they discover improper ventilation caused the electronic failure.
You must evaluate vertical drops and cabinet airflow meticulously. Standard vertical drop requirements range between 2 inches and 5 inches below the burner box. This empty space gives the internal cooling fans enough room to draw fresh air and expel hot exhaust.
Many kitchens feature drawers placed immediately below the cooking zone. You must install a protective heat shield or use a false drawer front if installing directly above usable storage. Utensils or towels stuffed into a top drawer can easily block intake fans. Direct installation above a wall oven requires even more careful planning. Wall ovens generate their own ambient heat, which compounds the cooling challenge.
Proper airflow moves front-to-back inside the cabinet box. Manufacturers often require a 1/4-inch to 1/2-inch gap at the rear of the cabinet base or behind the back panel. This slot allows hot air to escape the cabinet entirely. Without this rear gap, the appliance simply recirculates the same increasingly hot air.
Here are general guidelines to keep in mind:
Dimensional Variance Summary
| Appliance Category | Nominal Width | Typical Cutout Width | Typical Cutout Depth |
|---|---|---|---|
| Standard Small | 24 inches | 22.5 - 23.0 inches | 19.5 - 20.0 inches |
| Standard Medium | 30 inches | 28.5 - 29.0 inches | 19.5 - 20.0 inches |
| Standard Large | 36 inches | 34.5 - 35.0 inches | 19.5 - 20.0 inches |
| Modular/Single Hob | 12 - 15 inches | 11.0 - 14.0 inches | 19.0 - 20.0 inches |
Guesswork has no place in kitchen remodeling. Accurate measurement prevents expensive delays. Whether you order a high-end model or a standard built in induction cooktop, precise data dictates success. You must follow a strict measurement protocol.
Grab a reliable metal tape measure and a flashlight. Soft tailor's tapes stretch and warp, so avoid them entirely. Clear the countertop space before you begin.
Never trust brochure summaries or retail-site dimensions. Retail websites often copy-paste generic dimensions across multiple models. Relying on these numbers creates disastrous results. They might list the glass top dimension instead of the actual required hole.
Always download the official PDF installation manual from the manufacturer's website. Find the section labeled "Installation Requirements" or "Cutout Dimensions." If you cannot find the manual online, wait for the physical unit to arrive. Waiting feels frustrating, but it guarantees zero mistakes. Many professionals refuse to cut stone until the appliance sits physically in the room. They use the included cardboard template to trace the exact lines onto the quartz.
Upgrading an older kitchen often reveals frustrating surprises. Older gas or electric radiant models utilized vastly different chassis shapes. You rarely find a perfect drop-in replacement. You generally face one of two scenarios: the hole is too big, or the hole is too small.
A 1/2-inch gap seems minor, but it presents a major structural hazard. If the glass flange lacks proper support, the first heavy pot of boiling water will shatter the surface. Transitioning from older models frequently leaves you with an oversized void.
You can solve this problem safely. Custom stainless steel filler rings or trim kits bridge the gap perfectly. These metal frames sit on the stone and provide a new, slightly smaller lip for your new appliance to rest upon. They maintain structural integrity and look intentional. Many manufacturers sell proprietary trim kits specifically for this purpose.
We strongly warn against amateur DIY fixes. Do not use excessive silicone caulk to "float" the appliance in the hole. Avoid using wooden shims to prop up the metal chassis. Wood shifts, shrinks, and fails to distribute weight evenly. Silicone compresses over time. Only rigid metal frames provide the necessary load-bearing support for heavy cast-iron cookware.
A hole that is slightly too small presents a much tougher challenge. Expanding an existing cutout in finished granite, quartz, or Corian requires professional intervention. Cutting stone creates massive amounts of fine silica dust. This dust permeates cabinets, HVAC systems, and lungs.
Professional fabricators use specialized dust-extraction tents and water-cooled diamond blades to manage the mess. However, on-site cutting carries a real risk of cracking the slab. The narrow strips of stone in front of and behind the appliance are notoriously fragile.
Use a strict shortlisting logic here. Weigh the cost of professional on-site stone cutting versus returning the appliance. Paying a restocking fee for a slightly smaller model often costs less than hiring a stone fabricator. A smaller appliance avoids the dust, the mess, and the risk of a shattered countertop.
Before you finalize your online cart or sign a dealer invoice, run through this verification checklist. A few minutes of diligence prevents weeks of renovation headaches.
Precision in cutout dimensions forms the absolute foundation of a successful kitchen installation. Adherence to strict clearance requirements guarantees your electronics survive years of heavy daily use. Guessing measurements or ignoring ventilation rules invites expensive, frustrating failures.
We highly encourage buyers to finalize their appliance choice before fabricators finish their CAD drawings. Do not let them cut the stone until you possess the official manufacturer template. If you plan a retrofit, evaluate your current hole dimensions rigorously against the official PDF manuals.
Take the time to consult with your appliance dealer or a certified installer. Review the specification sheets together prior to purchase. Taking these calculated steps ensures your sleek new cooking surface drops into place perfectly on day one.
A: No universal standard exists. While many models hover around 28.5 inches by 19.5 inches, variances of up to an inch exist between different brands and product lines. This variance makes physical manufacturer templates or official specification sheets absolutely essential before cutting stone.
A: Yes, provided you meet the manufacturer’s minimum vertical clearance. This usually ranges from 2 to 5 inches below the unit. You must also install a protective heat shield if required by the manual to prevent items in the drawer from blocking the intake fans.
A: The glass edges will lack sufficient structural support. The weight of heavy cookware risks shattering the glass top entirely. You must use a manufacturer-approved trim kit or a custom stainless steel filler frame to distribute the weight safely across the stone.
A: We highly discourage DIY stone cutting. Cutting quartz or granite safely requires specialized diamond blades, active water cooling, and precise corner radius tools. Amateurs risk severe silica dust exposure and frequently crack the fragile stone strips near the front edge.


